
We're excited to announce the launch of our newest pip package, providing an easier way for you to natively interface with your Roboflow workspace through your Python scripts and easily deploy a model to an OAK device.
Due to popularity and feedback, we've made it even easier to deploy to OAK and the roboflowoak pip package is our recommended replacement for the current way of deploying to OAK via the container method.
Accessing Your API Key
If you've ever used our Upload API or Inference API you already have a Roboflow API Key for your workspace. If not, go to your workspace's settings to obtain one. You'll need it to use the package.

Each API Key is tied to a specific workspace; treat it like a password and keep it private because your API Key can be used to access and modify the data in your workspace.
Installing the Roboflow OAK Python pip Package
# enter the line below in your terminal within your python
# environment
pip install roboflowoak
Overview of roboflowoak Capabilities
Through the Roboflow python package you can:
- Access information about your workspaces, projects, and versions programmatically.
- Upload images locally to your web Roboflow project.
- Perform inference on models you've trained through our web UI.
- Visualize, and save predictions that you've made on the model.
Example Python Script for Running Inference with your Model
- Copy/paste the script below into VSCode, XCode, PyCharm, Spyder (or another code editor)
- Update the values for model/project [name], model version, api_key, and device_name within the "rf" object.
- Save the python file to a directory - be sure to note the directory name and file name as we'll need these later for the deployment to work.
- If you are deploying to an OAK device without Depth capabilities, set
depth=Falsewhen instantiating (creating) therfobject. OAK's with Depth have a "D" attached to the model name, i.e OAK-D and OAK-D-Lite.
from roboflowoak import RoboflowOak
import cv2
import time
import numpy as np

if __name__ == '__main__':
    # instantiating an object (rf) with the RoboflowOak module
    rf = RoboflowOak(model="YOUR-MODEL-ID", confidence=0.05, overlap=0.5,
    version="YOUR-MODEL-VERSION-#", api_key="YOUR-PRIVATE_API_KEY", rgb=True,
    depth=True, device=None, device_name="CHOOSE-A-DEVICE-NAME", blocking=True)
    # Running our model and displaying the video output with detections
    while True:
        t0 = time.time()
        # The rf.detect() function runs the model inference
        result, frame, raw_frame, depth = rf.detect()
        predictions = result["predictions"]
        #{
        #    predictions:
        #    [ {
        #        x: (middle),
        #        y:(middle),
        #        width: ,
        #        height: ,
        #        depth: ###->,
        #        confidence: ,
        #        class: ,
        #        mask: { }
        #       }
        #    ]
        #}
        #frame - frame after preprocs, with predictions
        #raw_frame - original frame from your OAK
        #depth - depth map for raw_frame, center-rectified to the center camera
        #To access specific values within "predictions" use: [p.json() for p[a] in predictions]
        # set "a" to the index value you are attempting to access
        # Example: accessing the "y"-value: [p.json() for p[1] in predictions]

        # timing: for benchmarking purposes
        t = time.time()-t0
        print("FPS ", 1/t)
        print("PREDICTIONS ", [p.json() for p in predictions])

        # setting parameters for depth calculation
        max_depth = np.amax(depth)
        cv2.imshow("depth", depth/max_depth)
        # displaying the video feed as successive frames
        cv2.imshow("frame", frame)

        # how to close the OAK inference window / stop inference: CTRL+q or CTRL+c
        if cv2.waitKey(1) == ord('q'):
            break
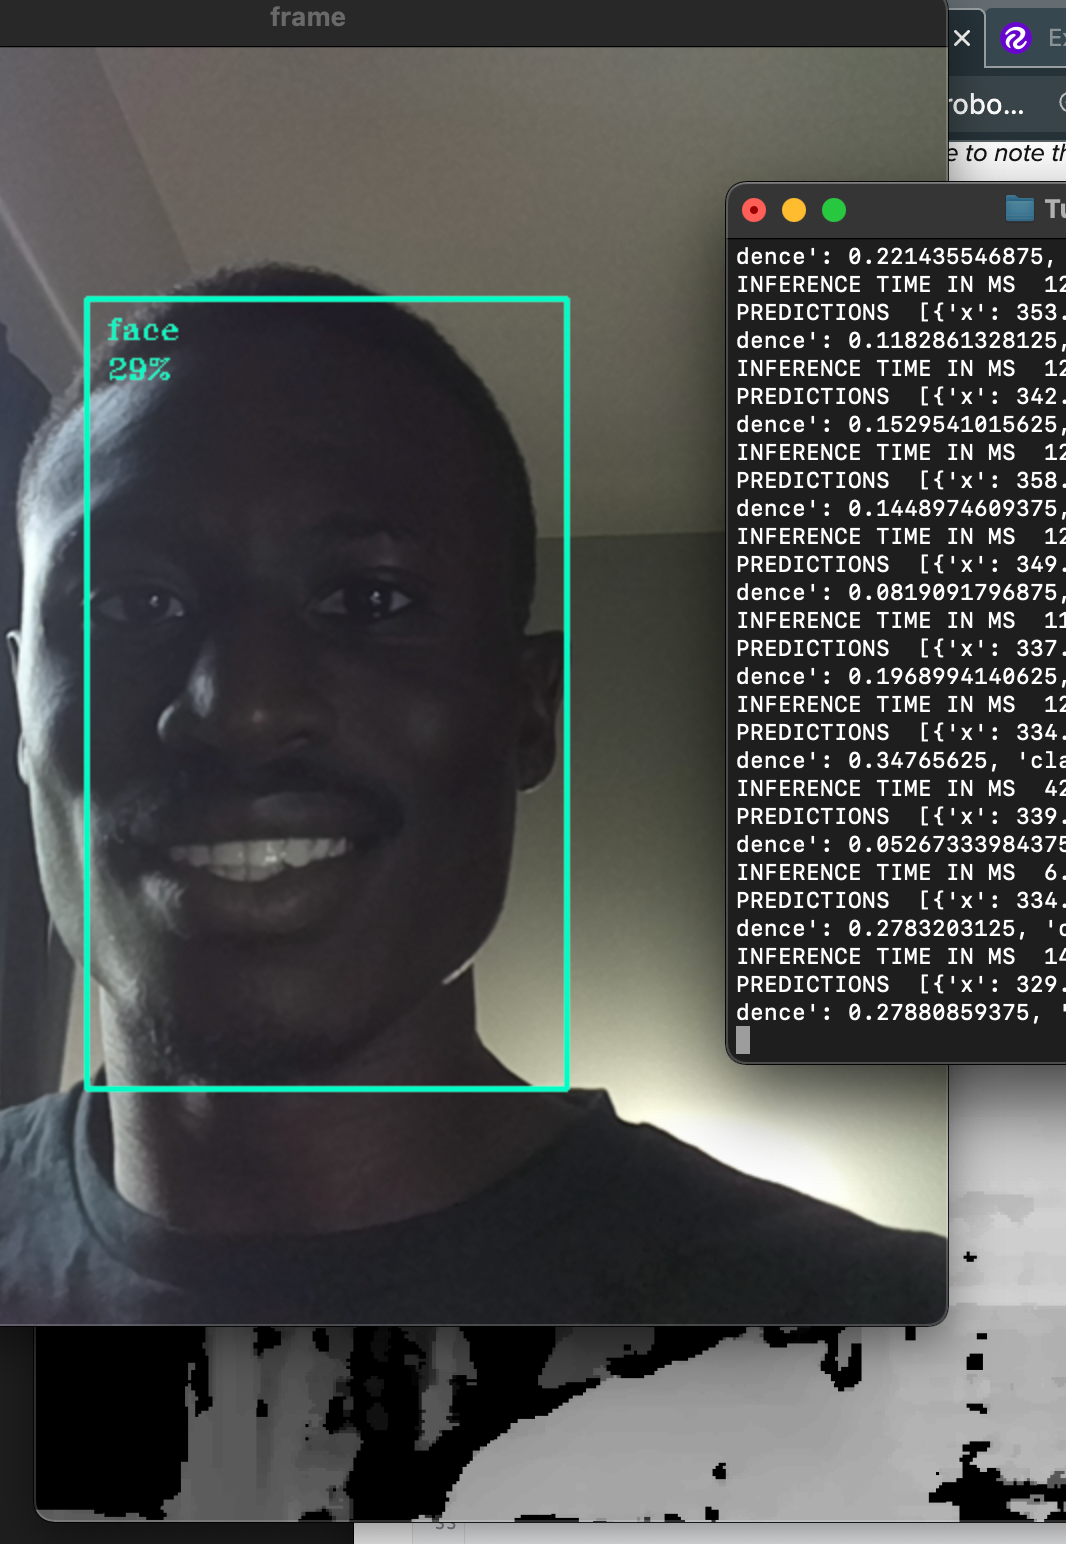
Notice the last few lines in our while loop for displaying the video output from our OAK device. The frame variable references the still-image frame (after preprocessing) from our OAK device, with the predicted detections.
Video feeds are essentially successive frames of images. The higher the processing power of your model's host device, the higher the frames per second, or fps.
Setting up OpenVINO and DepthAI
Check out our Knowledge Base for directions
Running Inference: Deployment
Enter the code below (after replacing the placeholder text with the path to your Python script)
python3 [YOUR-PYTHON-FILE].py
The inference speed (in milliseconds) for inference on the Apple Macbook Air 13" (M1) averaged around 15 ms, or 0.015 seconds.
To close the window (interrupt or end inference), enter CTRL+c on your keyboard.
Next Steps
You'll notice the low confidence on my detected face, even though it is clearly a face. We solve this issue by implementing active learning to root out false detections within our models and improve the confidence level on detections.
Build something cool with the pip package or have an idea for a project you'd like to feature on our blog or Roboflow Universe? Either let us know on the repository or drop us a line!